Picking your first baitcaster
Learning to cast with a bait caster shares many common principles across multiple target species, rod-powers and size of lures. With that said, the needs of specific fishing skills will influence your choice of reel. What makes the right baitcasting reel for you comes down to basic mechanical quality (poor reels are almost impossible to cast with) and the best spool capacity & weight for the lines and lures you want to cast. As with any skill, the right equipment is a big help in achieving success.
A good all-round starting option for most medium to medium/heavy line and lures should be somewhere between a “100” (general bass fishing) and “300” (inshore saltwater, pike/muskie and heavy bass fishing) size bait casting reel, with a “200” size being a good compromise “do most things” bait caster. For ultra light finesse fishing (including trout and pressured bass fishing), a reel in the “50” size or down to “BFS” (Bait Finesse System) specifications is needed.

In those finesse baitcasting styles, spool weight and spool depth become critical (since a deep spool with lots of line loaded on it – or just a heavy spool will destroy your ability to cast light lures). Because light lures and shallow/light spools magnify casting errors, it‘s probably easier to stick to sizes of 100 and above while getting started. Heavier lures provide a lot more feedback through the rod and as they pull the line from the spool – so (as long as the rod can cope with them), they tend to be easier to cast.
Gear Ratio & Left Hand vs. Right Hand Wind
As well as casting performance, you’ll need a reel with a gear ratio that keeps things comfortable during ideal retrieve speeds for the type of lure you’ll be fishing. The amount of line retrieved per handle turn is determined by gear ratio multiplied by spool circumference.
Since spool size is reasonably constant within each size-bracket of reel, then a short guiding rule would be that ratios in the region of 5:1 to 6:1 are for swimming baits fairly steadily or slowly, while ratios of 7:1 will be fast and 8:1 and over super-fast.
Regardless of whether you are right or left handed, you’ll have a preference for which hand you use to wind the reel. Anglers who have grown up with other styles of reel usually prefer to wind with their non rod hand. Many anglers in the baitcasting tradition like to wind AND cast with their dominant hand. When buying a baitcasting reel you need to make a choice as to exactly which hand you want to turn the reel handles with. Reels can labelled L, LH and LHW (left hand wind) or R, RH and RHW (right hand wind) to describe which side of the reel the crank is. For absolute clarity, a RHW reel has the handles on the right hand side when it is sitting on top of the rod, and is designed to be reeled with your right hand.
Obviously, if you reel with the same hand that you cast with, you’ll need to switch hands at the end of the cast before you start winding. The faster you can do this, the less it will eat into your effective fishing time.
Within established brands, it is pretty difficult to find a truly bad baitcasting reel. That makes your choice of baitcaster a bit easier. Once you know the lure-weight, retrieve speed and sensible line-capacity; then it’s just a case of matching an established brand and model to your budget. Videos on YouTube review channels such as “The Reel Test” can help you make an informed decision.
Essential Baitcasting Reel Features
One of the great things about baitcasting reels is they are WAY less prone to creating line twist compared to a spinning reel. Once you can cast fairly well, this gives you more confidence to use more expensive braided line. For many anglers, it’s a good motivation to buy a baitcaster reel and also to master the casting technique.
Once you have chosen your reel it’s important to get it loaded it with the appropriate amount of line. If in doubt, aim to leave about 2mm (1/16″) of the spool exposed and – if you buy in person – shop staff will often load your reel for you.
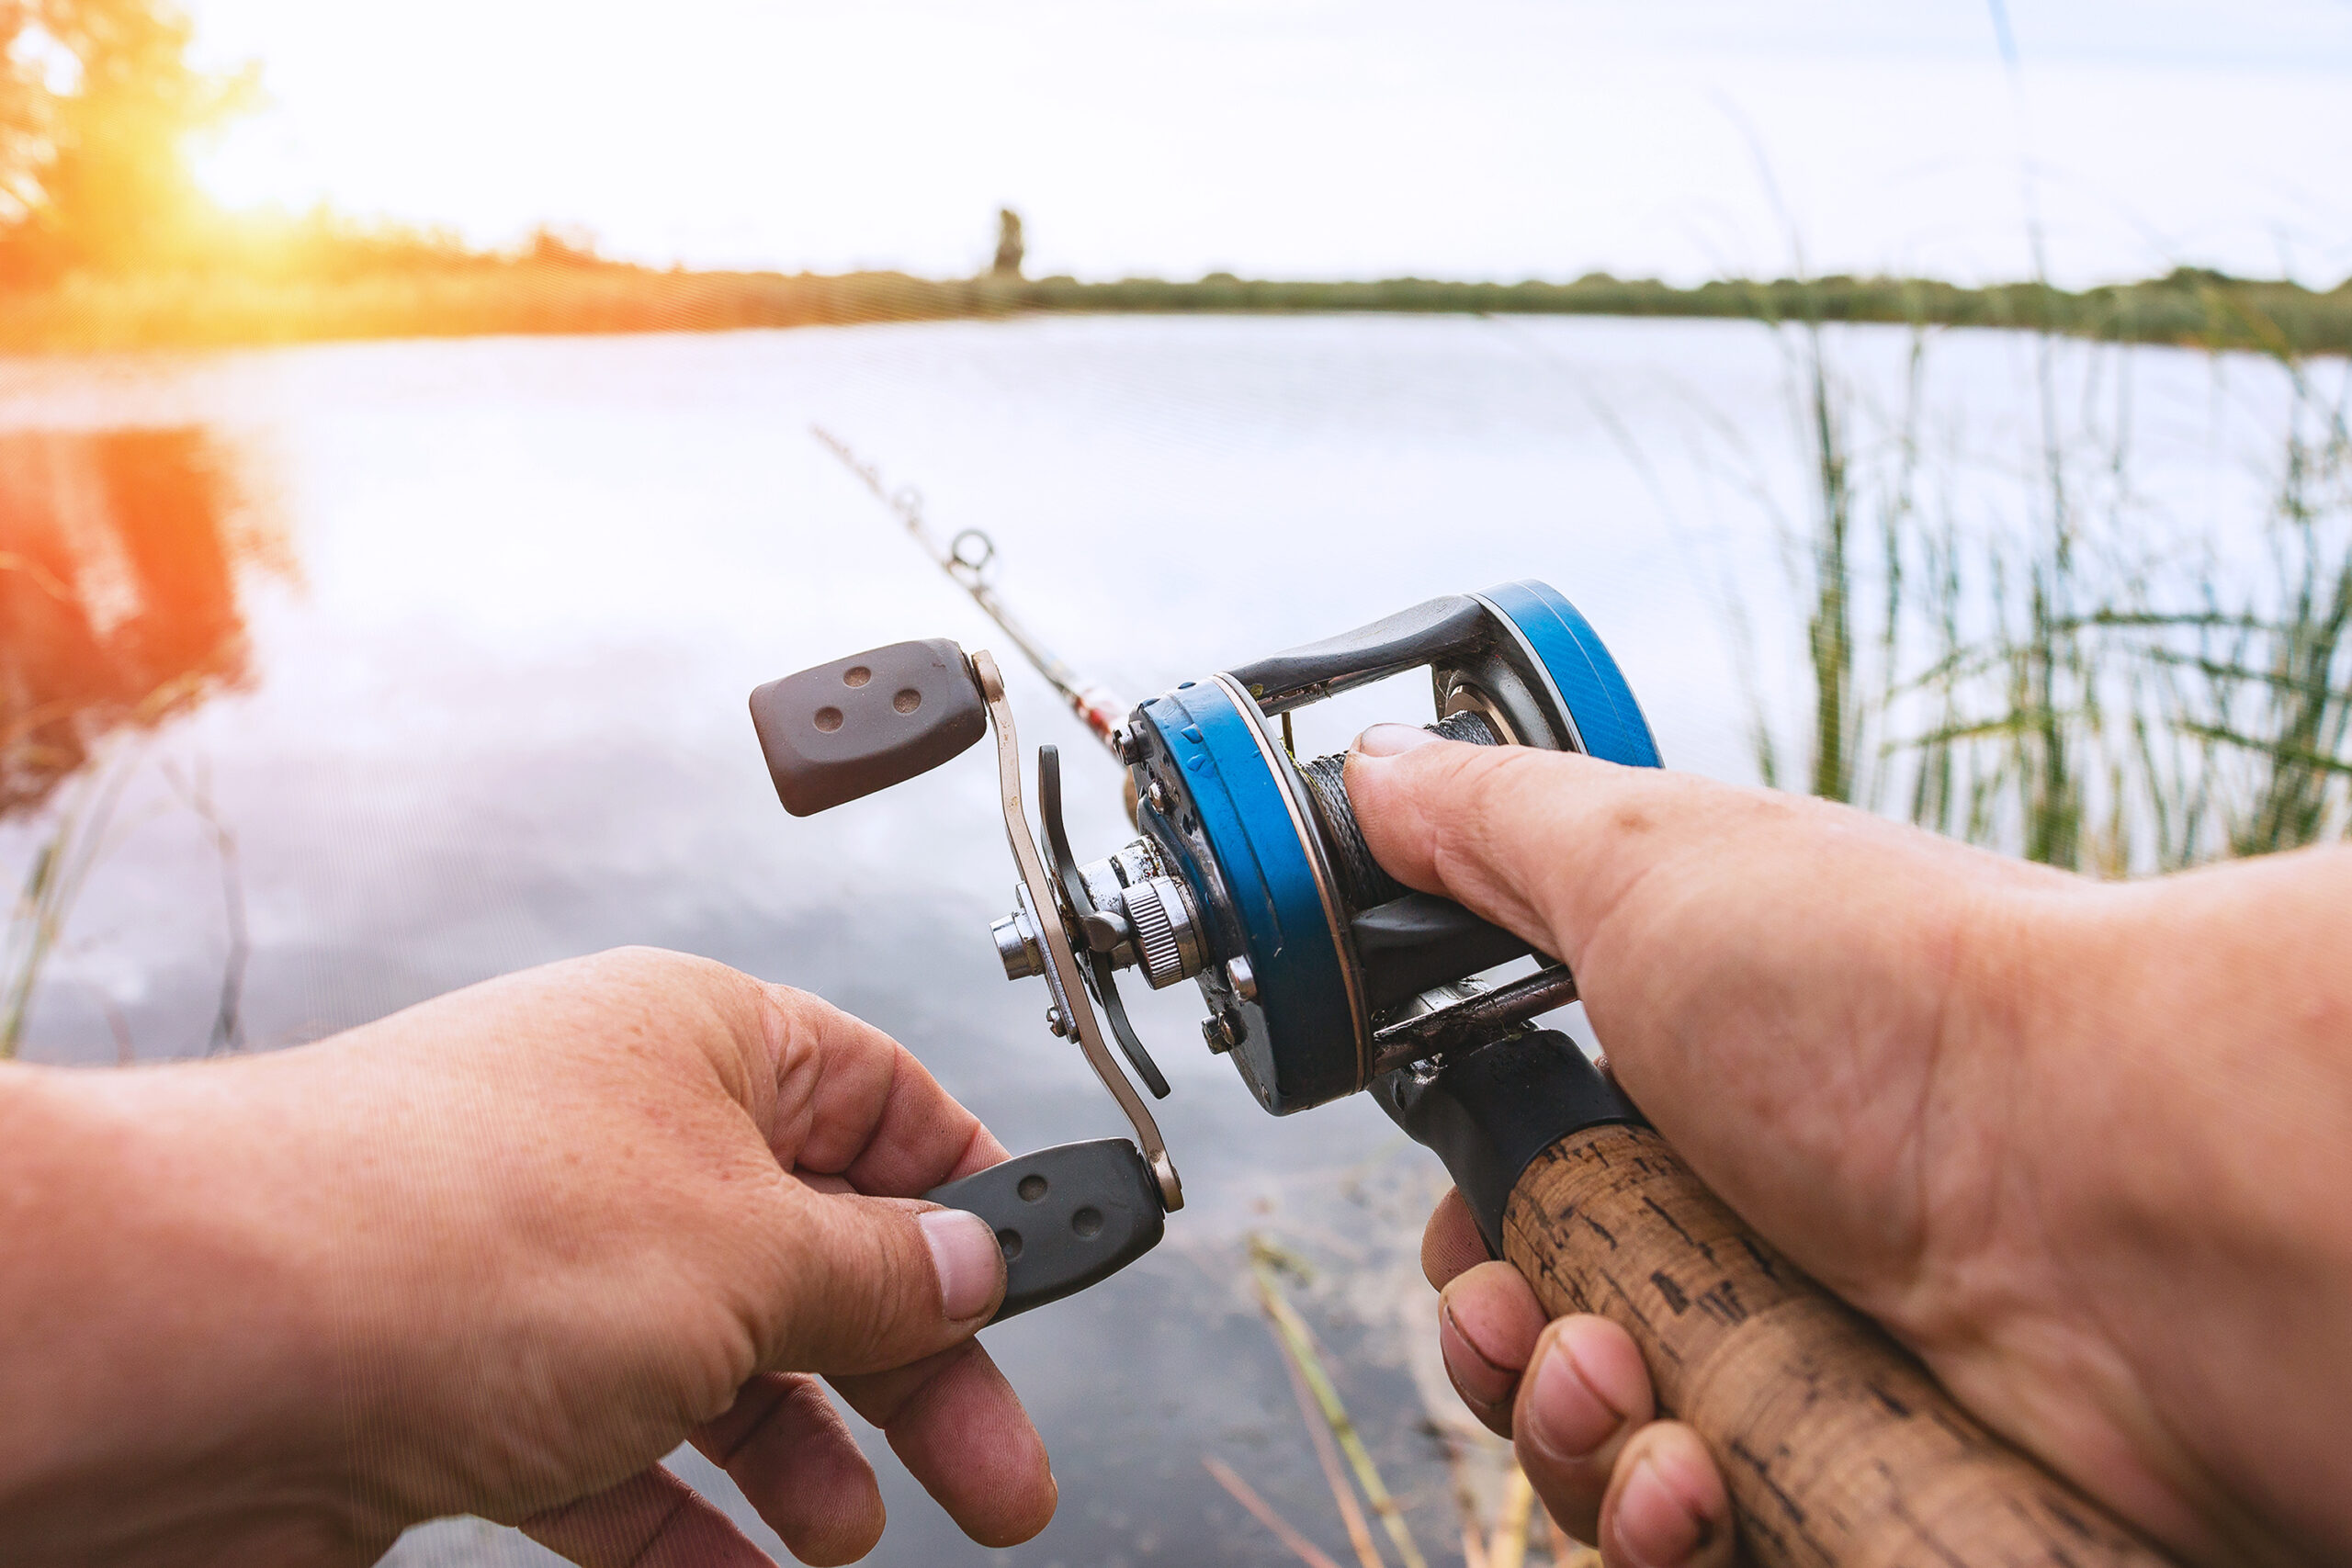
Before using your reel, make sure you know which of the dials and controls do each job. If you don’t have someone to show you, the instruction booklet supplied with your reel should have a labelled, exploded parts diagram to help you out. As a minimum you need to locate:
- The Spool Tension Knob
- The Thumb Bar (spool release button)
- Drag Star
- Cast Control Brake dial (or centrifugal braking system pins, if it is internal)
The Casting Technique
Now with your line loaded, your reel attached to the rod and the line threaded through the guides and tied on to your lure (or practice casting weight), it’s time for you to cast a baitcaster. Whether you are going to practice on the water or on a field, it might be safest to remove the hooks from any lure you learn to cast with.

First of all, hold the rod out in front of you with the tip of the rod somewhere around your eye-level. Wind the lure (or practice weight – just substitute the correct term for whatever you are casting) up until it is hanging about an inch (2-3cm) below the tip guide. Keep your upper arm comfortably at your side throughout the cast (from start to finish).
Hold the rod so that your dominant hand is closest to the reel – with your thumb hovering over the thumb-bar and resting gently on the outer wraps of line on the spool (and your index finger wrapped around the trigger grip on the rod). The reel should be uppermost and the trigger pointing down below the rod handle. For the sake of demonstration, let’s say this is your right hand (obviously, if you’re left handed, reverse the instructions that follow). In this case, your right arm will be your casting arm.
Pre-Flight Checks Before you Cast a Baitcaster
Press your right thumb firmly onto the spool (avoiding pressing the thumb bar down at this stage) and try pushing from side to side. If you can hear or feel a “clacking” as the spool shifts slightly from side-to-side, turn the spool tension knob to increase the tension gradually until that side-t0-side play just about disappears. This avoids the tension being set with too little pressure – and helps prevent the spool chattering during the cast.
You can check to see the spool tension is not creating too much pressure by pressing down the thumb-bar (to release or disengage the spool) and then lifting your thumb off the spool. The lure should drop smoothly away from the rod tip. Warning: Be careful to trap the spool with your thumb before the lure hits the ground though (otherwise you’ll get the dreaded backlash as the spool continues to rotate but the lure fails to pull the line out behind it).
Now set the cast control brake close to or at maximum. Depending on your reel, this will likely be either be a magnetic braking system or a centrifugal brake. Some reels have both. Centrifugal brakes may not be adjustable – or you might need to open up the side-plate of your reel and flick the required number of pins to engage each of the brake blocks. Always do this in opposing pairs of pins that face each-other across the diameter of the spool. That way, you don’t end up with an uneven application of braking force.
Finally, for the pre-flight checks, make sure that your drag is set to a realistic pressure you would use while fishing. If it’s too loose, you might find you struggle to reel in your lure between each cast!
By using these basic elements of a baitcaster’s settings, you should now be ready to cast a baitcaster for the first time. Before we do that, it’s worth understanding some fundamental principles of the casting motion itself.
Cast Principles When Using a Baitcasting Setup
Compared to casting with spinning gear, you usually need to release the line slightly earlier during the forward cast. It is also more important to load up (bend) the rod properly right from the start of that forward cast. In fact, with lighter lures, it will be helpful to load up the blank during a deliberate back-swing. This means the rod is already in a full bend BEFORE the start of the forward cast.
The reason rod-loading is important when using baitcasting gear is you need to overcome the inertia of the spool and start it spinning as the lure pulls line during the first part of the cast. For spinning reels, it is only the friction of the line paying out over the lip of the static spool that needs to be overcome. The difference betweent the two styles of casting is friction continues to increase on a spinning reel (as the level of line gets lower) while – once the spool is in motion on a bait caster – then it can be easier for the lure to continue to pull the line out. In theory, this can result in longer casting distance when using a baitcasting reel.
A balance needs to be struck between how fast the lure is travelling and how quickly line is paid out from the spool. If the spool is spewing out line faster than the lure is flying, then a bird’s nest (or backlash) will occur.
Mastering Two Key Stages of the Cast to Avoid Backlashes
The two most important stages of casting are right at the reel spool-start up stage (when you release your thumb and allow it to start spinning) and towards the end of the cast as the lure reaches towards its target.
In practical terms, this means your casting brakes must be set so they can control that rapid initial acceleration of the spool – and you must release the spool at the right time. Too early, and the lure will fly off course (and might not even travel forwards at all). Too late and the rod may already be straight – causing the lure to snatch, jarringly against the static spool. When that happens, the spool tries to go from zero to max speed in an instant. Two things result from this; first the lure’s forward flight is jammed for an instant and the spool starts whizzing round at max rpm. As you might guess, a slowed lure and a dramatically accelerated spool can only end one way (and that is a bird’s nest of line blowing up off your spool).
At the end of the cast, there tends to be a more gentle slowing down of the lure’s flight. An exception to this might be a sudden gust of a headwind part way through the cast. This is the reason that developing what is known as an educated thumb is useful. Whenever you get a sense the lure could be slowing down more than the casting brakes can manage, then some very light thumb-pressure can tame the rotations of the reel spool. As you gain more experience, you might prefer to rely less on automatic brake systems and more on subtle variations in the pressure you apply using your thumb during the cast.
At the exact moment the lure reaches the water, you need to stop the spool completely using just enough thumb pressure. That prevents the reel from over-running and spilling excess line out (and is the final key way to avoid backlash problems).
Step-by-Step Casting Skills
Basic Side Cast
With your pre-flight checks done and keeping in mind the key points of loading the rod, timing of thumb-release and replacing the thumb when the bait hits the water; we’re ready to cast.
Unless you are using a wire trace, start by winding your lure up to close to the rod tip. For traces that won’t slide easily in and out of the line guides, you will need to hang the lure at least the length of the trace below the tip top guide.
The distance from your rod tip to your lure at the beginning of the cast is known as “The Drop”. The shorter the drop, the easier it is to cast accurately and the less likely your lure will clash with the rod blank.
Assuming you have a two-handed grip baitcasting rod, take hold of the butt of the rod handle with your non rod hand (in our example this will be the left hand). Your left thumb should either rest on the side or on the top of the handle with the rod pointing out in front of you. Having your left foot slightly forward of your right helps to open up your shoulders and allow you to see more of what is happening to the rod during the cast.
Your right hand should have the thumb resting on the spool as described already and the rod tip should point towards (and a little above) your target. Aim at a point about two feet above the water’s surface to begin with.
The elbows of both arms should, ideally, rest in a relaxed fashion against either side of your ribcage. If you are needing to raise your elbows up a little to keep your lure clear from obstacles, then your upper arms should be held close to your body (and not flare outwards). This helps the rod do more of the work for you.

Press down the thumb bar to release the clutch, while trapping the spool under your thumb. Smartly draw the rod backwards around your body, with the tip pointing just a little above horizontal throughout the back-swing. Make sure to “block” (i.e. stop) the backswing just before the rod is pointing completely behind you. This helps to load the rod.
Without pausing, pull your left hand into your chest and extend your right forearm to push your right hand towards the target. Before your casting arm extends completely, release your thumb and continue to push your right hand forwards until your arm is almost straight.
Hold the rod forward while the lure flies out and, if necessary, control the line release with your thumb (and remember to stop everything just as the lure lands)
Finally, turn the reel handles to re-engage the clutch and make your baitcaster reel ready to retrieve line and hook up on a fish!
If you find the brakes seem to be set too high (for instance if the lure pulls hard to the left, no matter how early you release your thumb); then reduce the settings until it flies out straight – while still avoiding the dreaded back lash.
Making Longer Casts
Once you are comfortable with the side cast, you can experiment with longer casts by modifying the casting stroke into an overhead action. This is just a case of pulling the rod back over (instead of around) your shoulder and throwing the lure UP and OUT at somewhere around 45-degrees.
Timing your release is a bit more important for overhead casts since too late will bomb your cast into the water and too early will result in a backlash.
Top bait caster mistakes
Apart from incorrectly setting up baitcasting reels, the top mistakes come from things like:
- Jerky 0r uneven power application of the casting stroke
- Releasing the thumb too late
- Snagging something on the back cast
- Not stopping the reel when the lure hits the water
FAQS
How do you cast a baitcaster for beginners?
I strongly recommend starting out by following both the “pre flight checks” and also the “basic side cast” instructions in this article for any beginners with baitcasting reels
Can you cast with a baitcaster reel?
Although there are some “jigging” reels that look like a bait casting reel, those may not be well designed for casting. However, a true bait casting reel is absolutely something you can cast really well.
Is it hard to cast a baitcaster?
If you set up your baitcasting reel properly and it is well matched to the rod you’re using and the weight you want to cast, then a baitcasting reel is not so hard to cast. The main thing is getting over the fear of bird’s nests. That is best done by following the instructions in this article and simply having a try.
Why can’t I cast far with my bait caster?
The most common causes of restricted casting distances are:
Casting brakes or spool tension set incorrectly (either too high; not allowing line to pay out – or too low causing bird’s nests)
Poor match-up of rod-power, lure weight and spool weight
Making any/all of the top mistakes listed earlier in this article